

How To Draw Dashed Line In Latex
Downwards to the Millimeter
LaTeX as well provides a command to create a grid. You can thereby create a coordinate system or even generate graph newspaper.
The command in line two of Listing three causes LaTeX to depict a filigree with 1-mm increments. The help lines option renders the lines thin and gray. The coordinates in the kickoff parentheses indicate the lower left corner of the graphic, whereas the coordinates in the second set indicate the upper right corner.
List three
Graph Newspaper
01 \brainstorm{tikzpicture} 02 \describe[step=1mm,help lines] (0,0) grid (50mm,50mm); 03 \draw[stride=10mm] (0,0) grid (50mm,50mm); 04 \end{tikzpicture} With line 3, you superimpose a second set of thicker lines in 10-mm intervals, thus creating graph paper (see Figure ii).
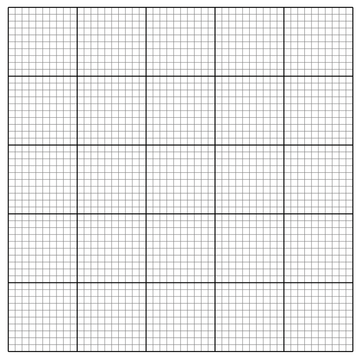 Effigy two: It takes ii lines of LaTeX code to create elementary graph paper.
Line Styles
Table two shows a summary of the commands that you can use as options for setting line thicknesses. Listing iv shows an example.
Table 2
From Thin to Thick
| Command | Thickness |
|---|---|
line width=<thickness> | Based on the given value |
ultra thin | 0.1 point |
very thin | 0.2 signal |
thin | 0.iv point |
semithick | 0.6 indicate |
thick | 0.8 point |
very thick | 1.two point |
ultra thick | i.vi point |
Listing 4
Line Thickness
01 \begin{tikzpicture} 02 \draw[ultra thin] (0,0) -- (six,0); 03 \draw[very thin] (0,0.v) -- (half-dozen,0.5); 04 \depict[thin] (0,1) -- (6,1); 05 \draw[semithick] (0,1.5) -- (vi,1.v); 06 \draw[thick] (0,two) -- (6,2); 07 \depict[very thick] (0,two.5) -- (6,ii.5); 08 \depict[ultra thick] (0,3) -- (six,3); 09 \draw[line width=2pt] (0,3.5) -- (half-dozen,3.5); ten \cease{tikzpicture} Apart from line thickness, you can likewise determine the line style. Table 3 shows a summary of possible commands. List 5 shows an instance, with the outcome in Figure three.
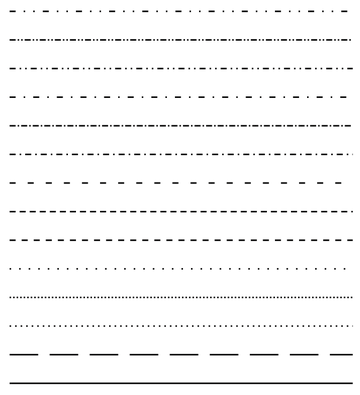 Figure 3: LaTeX provides commands for different line patterns.
Table iii
Patterned
| Command | Pattern |
|---|---|
solid | Solid line (default) |
dash pattern=on <width> off <width> | Dashed line consisting of dashes at the specified on width and gaps at the specified off width |
dotted | Dotted line |
densely dotted | Densely dotted line |
loosely dotted | Loosely dotted line |
dashed | Dashed line |
densely dashed | Densely dashed line |
loosely dashed | Loosely dashed line |
dashdotted | Alternate dashed and dotted line |
densely dashdotted | Alternating densely dashed and dotted line |
loosely dashdotted | Alternating loosely dashed and dotted line |
dashdotdotted | Alternate dashed and double-dotted line |
densely dashdotdotted | Alternating densely dashed and double-dotted line |
loosely dashdotdotted | Alternating loosely dashed and double-dotted line |
Listing 5
Dashed Lines
01 \begin{tikzpicture} 02 \depict[solid] (0,0) -- (6,0); 03 \describe[dash pattern=on 5mm off 2mm] (0,1) -- (six,1); 04 \draw[dotted] (0,2) -- (half dozen,2); 05 \draw[densely dotted] (0,three) -- (six,3); 06 \draw[loosely dotted] (0,4) -- (6,four); 07 \draw[dashed] (0,5) -- (6,five); 08 \draw[densely dashed] (0,half dozen) -- (half-dozen,6); 09 \draw[loosely dashed] (0,7) -- (6,seven); x \draw[dashdotted] (0,8) -- (6,8); eleven \draw[densely dashdotted] (0,9) -- (half-dozen,9); 12 \draw[loosely dashdotted] (0,x) -- (6,10); 13 \draw[dashdotdotted] (0,xi) -- (6,xi); xiv \draw[densely dashdotdotted] (0,12) -- (vi,12); 15 \draw[loosely dashdotdotted] (0,13) -- (vi,xiii); sixteen \terminate{tikzpicture} You can create lines as arrows. List half-dozen provides two examples. You specify an option to determine the arrow's appearance. In the middle is always a double hyphen. The left-hand parameter sets the beginning of the arrow, and the correct-manus parameter sets its ending. You use a greater-than symbol for the arrowhead, ii greater-than symbols for a double arrowhead, and a vertical bar for a simple line ending.
Listing half dozen
Arrowheads
01 \tikz{\depict [|->] (0,0) -- (two,2);} 02 \tikz{\draw [->>] (0,0) arc (15:60:3cm);} You tin can also specify how the line ends should look by using the line cap=<style> option. The styles include butt (default), rect , and round . Listing 7 shows an instance and Figure 4 shows the result.
 Effigy 4: Various line endings: barrel (bottom), rect (middle), and round (top).
List 7
Line Endings
01 \begin{tikzpicture}[line width=12pt] 02 \draw[line cap=butt] (0,0) -- (6,0); 03 \depict[line cap=rect] (0,1) -- (6,i); 04 \draw[line cap=circular] (0,two) -- (6,2); 05 \cease{tikzpicture} With the line bring together=<style> option y'all tin make up one's mind how corners should await. Styles include miter (default), bevel , and round . List viii gives an example and Figure 5 shows the output.
 Figure five: Corners tin expect different: miter (bottom), bevel (middle), and round (top).
Listing eight
Corners
01 \begin{tikzpicture}[line width=12pt] 02 \draw[line join=miter] (0,0) -- (1,one) -- (0,2); 03 \draw[line bring together=bevel] (2,0) -- (3,1) -- (ii,2); 04 \draw[line join=round] (4,0) -- (5,1) -- (4,2); 05 \end{tikzpicture} You can change the line color past specifying an selection. The tikz package automatically loads the xcolor package and then that you can have extensive color application possibilities.

How To Draw Dashed Line In Latex,
Source: https://www.ubuntu-user.com/Magazine/Archive/2014/22/Creating-vector-graphics-with-LaTeX-and-TikZ/%28offset%29/2
Posted by: williamsalannow.blogspot.com
0 Response to "How To Draw Dashed Line In Latex"
Post a Comment